Navigating move-out inspections can be challenging for both landlords and tenants. The inspection compares the property's current condition to its original state, helping landlords protect their investment and ensuring tenants receive fair security deposit refunds. Tenants must meet their lease obligations, including cleaning and fixing minor damage.
Landlords, in turn, should use a detailed move-out inspection checklist to thoroughly review every room, including kitchens and bathrooms. This process enables them to create a comprehensive move-out inspection report with accompanying photos. With LeaseRunner, managing the entire move-out procedure for tenants and landlords becomes simple and clear, which reduces conflicts and speeds up lease turnover. Scroll down for more information now!
What Is a Move-Out Inspection?
A move-out inspection is the final, formal review of a rental property that is conducted by the landlord or property manager after the tenant has permanently vacated the premises. Its primary objective is to identify damage beyond normal wear and tear by comparing the property's current condition to its state at move-in.
The inspection determines whether the tenant has met all cleaning and repair requirements outlined in the lease terms and is a crucial step in the security deposit refund process. This process differs from a pre-move-out inspection, which occurs before the tenant leaves, providing them with a final opportunity to address issues and maximize their deposit return.
Landlords use the inspection to create a detailed report for the move-out inspection. This helps decide if any security deposit deductions apply or if a refund is due. For example, landlords use a landlord walk-through checklist. This list checks for cleanliness, wall condition, and whether appliances are functioning properly.
Tenants benefit by knowing their obligations when moving out. This knowledge helps them avoid unexpected charges. Clear inspections help both parties and speed up the return of security deposits.
Standard Move-Out Inspection Process for Landlords

A thorough move-out inspection is essential for landlords. Doing this properly ensures their property is back in good condition and that tenants understand their responsibilities. Let’s move to the next section and see the steps we suggest to you right below!
Step 1: Notify Your Tenant
Please notify your tenant of the move-out inspection date well in advance. Ideally, you’ll schedule a time when both of you can be present. This ensures transparency and helps your tenant prepare for the inspection. If your tenant is leaving, you might need to send them a written notice to vacate, such as a notice to terminate tenancy.
Step 2: Prepare a Checklist
Create a detailed move-out inspection checklist specific to your property. This list should cover all areas, including floors, walls, appliances, and fixtures. You can find templates online or customize one based on previous move-in inspection records. Being organized helps reduce disputes about damages and cleaning.
Step 3: Gather Necessary Supplies
Before the inspection, print your checklist and bring the necessary tools, including a camera, flashlight, and a pen. Taking photos of any existing damage or cleanliness issues provides evidence later. Having everything ready reduces delays and ensures thorough documentation during the apartment walk-through move-out.
This documentation is also crucial in determining the amount of a security deposit for an apartment. Yet, you should still be aware that a move-in fee and a security deposit are totally different things.
Step 4: Conduct the Inspection
Perform the walk-through with your tenant if possible. Check all rooms and outdoor areas, noting any damages or missing items that exceed normal wear and tear. Use your checklist to ensure consistency. Take detailed notes and photos to support the move-out inspection report. This process helps both parties understand the property's condition.
Step 5: Review and Communicate
After the inspection, discuss any issues with your tenant. Send the inspection report and photos, especially if deductions from their security deposit are needed. Clarify expectations for cleaning or repairs before returning the deposit. This helps prevent misunderstandings and speeds up the security deposit refund process.
Following these steps on what landlords should do during the inspection ensures a smooth, fair, and consistent move-out inspection process for both landlords and tenants.
Who Should Be Present and What Documents Are Needed?

Tenants should be present during the move-out inspection whenever possible. Being there allows tenants to see any concerns firsthand and discuss how to address them. Landlords usually bring the original move-in inspection form. This form helps compare the apartment’s past and current condition.
Both landlord and tenant should agree on inspection notes and take photos to create a clear move-out inspection report. If a tenant has filed a complaint, documenting the property's condition helps prevent issues such as tenant harassment claims.
For example, during an apartment walk-through move-out, a landlord might find a stain on the carpet. The tenant can then explain whether the issue was pre-existing or occurred during the tenancy. Agreeing on these details early helps avoid disagreements later.
Proper documentation of the inspection, including written notes and photographs, supports transparency. It also speeds up the security deposit refund process. Landlords must also respect tenant privacy and legal limits for inspections, as detailed in what a landlord cannot do.
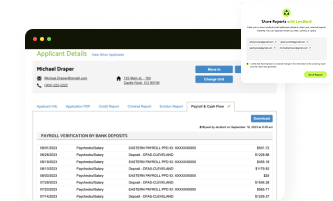
Using LeaseRunner’s tools, both parties can organize and securely store all inspection documents. The tenant understands their obligations when moving out, and the landlord has clear evidence for any deductions. This collaborative approach benefits everyone during the critical move-out stage.
Step-by-step Move-Out Inspection Procedure for Landlords

Conducting a thorough move-out inspection helps landlords protect their property and ensures a smooth transition. Here is a clear guide broken down into key steps.
Before Inspection
Preparation is key to a fair and efficient move-out process. A well-prepared landlord can save time and prevent unnecessary disputes.
- Step 1: Notify tenants early. Give them plenty of time to prepare and schedule a walkthrough.
- Step 2: Provide a move-out list for tenants that outlines cleaning and repair duties. This list helps ensure the unit is returned in good condition, reducing the need for security deposit deductions.
- Step 3: Confirm the move-out procedure with tenants to ensure expectations are clear.
- Step 4: Gather essential documents, including the original lease, previous inspection reports, and the security deposit agreement. These documents serve as references during the inspection.
Having these records on hand provides an objective standard for comparison against the unit's current state. This includes checking for proof of renters' insurance, which may cover damage caused by the tenant.
During Inspection
The inspection is your opportunity to formally document the condition of the rental unit. It must be systematic and objective to legally justify any necessary deductions.
- Step 1: Use a detailed landlord walk-through checklist during your inspection.
- Step 2: Check every room carefully and compare its state to the original condition. Pay special attention to areas prone to damage, such as kitchen countertops, bathroom grout, and window blinds.
- Step 3: Look for damage beyond normal wear and tear. Inspect the cleanliness of walls, floors, and the function of appliances. Wear and tear refers to the natural deterioration that occurs with use, while damage refers to physical harm caused by neglect or accident.
- Step 4: Take photos to back up your move-out inspection report. For example, spot stains on carpets or broken fixtures, and record them clearly. Ensure your photos are date-stamped and clearly display both the item and the extent of the damage.
After Inspection
The post-inspection phase focuses on clear communication and timely compliance with legal requirements.
- Step 1: Share the inspection report promptly. Share the completed inspection report immediately. Discuss any damages requiring security deposit deductions quickly, as timely communication is crucial and often required by local law.
- Step 2: Comply with the security deposit law. Strictly follow your state's rules regarding deposit refund timelines and procedures. If the tenant owes money, prepare and send a formal notice of past-due rent to ensure all financial matters are addressed legally.
- Step 3: Document and organize all relevant information. Use a reliable system or tool to organize all inspection records and keep all communications logged in one place. This detailed documentation ensures a fair, efficient, and dispute-free transition.
All in all, clear communication helps avoid disputes and speeds up the refund process. You can also use LeaseRunner to organize inspections, keep records, and track communications. This makes landlord-tenant collaboration simple and effective.
Finalize the security deposit settlement by either refunding the full amount or sending an itemized list of deductions along with the remaining balance. This final step concludes the tenancy relationship and is crucial for ensuring legal compliance.
Complete Move-Out Inspection Checklist For Landlords

A comprehensive move-out inspection checklist enables landlords to thoroughly and fairly assess the property. It covers every part of the rental to make sure the tenant has met their responsibilities and to document any damage beyond normal wear and tear. Below is a detailed checklist landlords can use for a smooth and transparent inspection.
1. General Property Condition
Start your inspection by assessing the overall structural integrity and basic condition of the entire unit:
- Inspect Structure: Check for cracks, holes, or damage to walls, floors, and ceilings.
- Evaluate Cleanliness: Note any stains on carpets or floors, as well as any lingering unpleasant odors.
- Safety Devices: Verify that smoke detectors and carbon monoxide alarms are properly installed and functioning.
2. Throughout All Rooms
Next, systematically go through every room in the property, paying close attention to utilities and fixtures:
- Electrical Check: Test all electrical outlets and light switches for proper operation.
- Window Coverings: Confirm blinds, curtains, or shutters are intact and in good repair.
- Pest Signs: Look for any signs of pest infestations (e.g., droppings, holes in walls).
3. Kitchen
The kitchen contains high-value appliances and essential plumbing, making a detailed inspection critical here:
- Appliance Function: Test the stove, refrigerator, and dishwasher to ensure they are working correctly.
- Cabinets & Counters: Inspect countertops for scratches or chips, and check cabinets for loose or broken hinges.
- Plumbing: Verify that sinks, faucets, and drains function smoothly and are leak-free.
4. Bathrooms
Bathrooms are prone to moisture issues, so focus on cleanliness, proper drainage, and ventilation:
- Plumbing Function: Check that toilets, sinks, and showers flush and drain properly.
- Tile and Grout: Inspect the grout and tiles for mold, cracks, or missing pieces.
- Ventilation: Ensure that the ventilation fans or windows are functioning to prevent moisture buildup.
Security Deposit Refund Rules and Timelines
Landlords must obey local laws strictly. These rules govern the return of the security deposit. Laws set the deposit return timeframes. This period runs from 14 to 30 days. It starts after the tenant moves out. It begins when they return possession.
For example, California gives landlords 21 days. Other states may give only 14 days. Missing this deadline has risks. The landlord may lose the right to make deposit deductions. They may also owe the tenant a penalty.
Documentation and Transparency
The landlord must provide a document. This is an itemized move-out inspection report. It is needed to legally keep money. The report must list all damages. These must be more than normal wear and tear. It must also show the cost to repair them. For example, carpet cleaning costs $150.
The report must clearly state the charge. It must say "Carpet Stain Remediation: $150." If a replacement window costs $300, list that. The remaining initial deposit goes back. It is sent with this statement.
Streamlining the Process
Using property management software is smart. Tools like LeaseRunner help track returns. This ensures timely and transparent returns. Landlords can easily make the move-out report. They can send the notice fast. They send it to the tenant's forwarding address. Clear communication helps everyone. It minimizes disputes. It keeps a professional landlord-tenant relationship.
Common Tenant Errors Leading to Security Deposit Loss During Move-Out

Moving out can be a stressful time for tenants. However, certain mistakes often put the security deposit refund at risk. Understanding these common errors and taking proactive steps can ensure a smoother transition. This will maximize the return of your initial deposit. Tenants should treat the move-out process with great care. It must match the attention given during the initial rental agreement process.
1. Cleaning and Maintenance Oversight
Inadequate or surface-level cleaning is the most frequent reason for significant security deposit deductions. Tenants often fail to perform the deep cleaning necessary, missing crucial areas like inside appliances, removing embedded dirt from carpets, or thoroughly scrubbing grout lines. Furthermore, neglecting outdoor maintenance (if required by the lease, such as mowing or sweeping the garage) also results in additional charges.
Solutions: Hire a professional steam cleaning service to remove embedded stains and dirt from your carpets. Thoroughly deep clean the kitchen (especially the oven and stove for grease removal) and the bathroom (scrubbing grout to eliminate mildew/soap scum).
Additionally, clean all appliances inside and out (including the refrigerator) and complete any required outdoor maintenance (lawn, hedges, sweeping) before the final inspection date.
2. Communication and Administrative Errors
Poor communication and administrative errors severely delay or complicate the deposit return. Failing to provide a correct forwarding address in writing means the landlord cannot send the final check or required paperwork promptly. Additionally, skipping the required move-out inspection (walkthrough) or failing to provide documentation (such as photos) makes it more difficult to assess the property's condition and resolve disputes.
Solutions: Provide a forwarding address in writing before your official move-out date so the landlord can mail the final deposit and paperwork. Furthermore, attend the scheduled move-out inspection (or send a representative) and have clear photos showing the unit’s final state to confirm you meet the lease terms and prevent disputes.
3. Damage and Repair Issues
Tenants are financially responsible for damage that exceeds normal wear and tear. A major mistake is ignoring, hiding, or poorly concealing damage (like a cracked window or nail holes) instead of addressing it professionally or reporting it immediately.
Solutions: Address small, simple issues yourself (for example, using spackle to fill small nail holes, ensuring all light fixtures have working bulbs) to avoid expensive professional charges. For major issues, immediately report the damage (for instance, a broken cabinet door, a cracked window) to the landlord and never attempt to conceal property damage, as hiding issues can result in the immediate forfeiture of the deposit.
4. Financial and Planning Mistakes
Final financial mistakes are legally tied to the deposit return. The two most common errors are breaking the lease early without a formal agreement (triggering penalties that often exceed the deposit) and illegally withholding the final month’s rent, mistakenly believing the security deposit should cover it. The security deposit is a separate financial instrument and cannot be used as rent.
Solutions: To avoid financial penalties if you move out early, refer to your lease and negotiate a formal lease break agreement to minimize your liability. Critically, always pay the final month’s rent on time as required by the tenancy agreement; never withhold the final rent payment, as using the deposit for rent is illegal in most jurisdictions.
Key Advantages of Move-Out Inspection for Landlords
The move-out inspection is essential for protecting property investment. It provides landlords with documented proof of the unit's condition. For example, date-stamped photos of a hole in the wall or severe carpet stains give objective proof of property damage beyond normal wear and tear.
This evidence is needed to legally make deposit deductions. The inspection also reduces deposit disputes through transparency. Sharing the itemized move-out inspection report clearly shows why funds are withheld.
Furthermore, a prompt inspection expedites turnover. Landlords can plan proactive repairs right away. For instance, knowing immediately that the stove needs appliance repair allows the landlord to schedule the technician quickly. This fast action minimizes the vacancy period before a new tenant moves in.
Key Advantages of Move-Out Inspection for Tenants

The inspection greatly benefits tenants aiming to recover their full security deposit. Tenants who prepare properly can help recover the full amount of their security deposit. Attending the scheduled walkthrough allows the tenant to identify any issues immediately. This clarifies repair responsibilities upfront.
For example, the landlord might point out a spot that was missed during the deep cleaning. The tenant can then correct the issue immediately if allowed. This open process builds trust and generally smooths the final rental experience. Following the formal move-out procedure ensures a clear and professional conclusion to the lease.
Conclusion
A well-executed move-out inspection safeguards everyone. This necessary move-out inspection clarifies the property's final condition. Tenants must prepare the unit properly. Landlords must document things carefully. This meticulous action reduces conflicts over deposit deductions and repair costs.
Overall, landlords can use platforms like LeaseRunner. This tool not only streamlines the organization of inspection reports and keeps all communications logged in one place, but it also aids in understanding the full move-out procedure, which is essential for a fair and efficient transition.
FAQs
1. Is a move-out inspection legally required?
No, it's not legally mandatory everywhere. However, most landlords perform this final walk-through. They do it to document the final property condition and to protect the security deposit. Without clear documentation, justifying deposit deductions becomes nearly impossible in court.
2. Can I deduct the costs of repainting or cleaning from the deposit?
Yes, a landlord can deduct costs for repainting or deep cleaning the unit. This is only permitted if the expense is necessary to restore the unit to its original state, beyond normal wear and tear. For example, removing excessive dirt or fixing large crayon marks is deductible. Simple fading or small scuff marks are usually considered normal.
The landlord must provide itemized estimates or receipts for all expenses. This shows the tenant exactly how much the repair costs were.
3. What if the tenant doesn’t leave a forwarding address?
Landlords still have a legal duty to return the remaining initial deposit. They must make reasonable efforts to contact the tenant. This might mean sending the refund check and the itemized move-out inspection report to the tenant's last known address.
Without a proper forwarding address, refunds and any further communication will be delayed. However, the legal obligation for a refund remains in place.
4. Can the landlord just walk in?
No, a landlord cannot just walk into a rental unit. They must provide proper notice, usually 24 hours, before entering. Entry should be made during reasonable hours and for legitimate reasons, such as repairs or inspections. Emergency situations may allow immediate entry without notice.
5. How to Complete the Move-In Inspection Form?
Start by examining the rental property with the tenant on the day of move-in. Note the condition of walls, floors, appliances, and fixtures. Use the form to document damages or wear, and have both parties sign it. This creates a baseline for the final move-out inspection report.
6. Can I move out before my lease is up?
The answer is “It depends”. Moving out early depends on the lease terms and the landlord's approval. Tenants should notify early and may face penalties or loss of the security deposit unless an agreement is made. Review your lease or consult resources like LeaseRunner for guidance on how to terminate the lease early.
7. What to do when a tenant moves out?
Landlords should schedule a move-out inspection promptly after the tenant has left. Complete the walkthrough using a landlord checklist for tenant moving out, document damages, and determine deposit returns. Communicate clearly with the tenant and adhere to state laws regarding security deposit refund rules and timelines.
8. How long after the final inspection can you move in?
The time varies by lease terms and local laws, but typically, landlords can prepare the unit immediately after inspection. Some states allow a few days for repairs or cleaning before new tenants move in.